Lab 5 - Kubernetes Networking
Welcome to the lab 5. In this session, the following topics are covered:
- Kubernetes networking basics;
- Kubernetes Services;
- Kubernetes Gateway API;
- Kubernetes NetworkPolicies.
Kubernetes networking basics
Kubernetes manages several network-based communication models:
- Pod-to-Pod;
- Container-to-container;
- Pod-to-Service;
- External traffic to Service.
During this practice, you are going to discover first, third, and fourth models. The main entities we use during this journey are Service, NetworkPolicy and Gateway API.
Use-case development
Before starting the main part of the lab, you will need to implement a history data server application and update the price fetcher script to send data directly to the history data sever over HTTP.
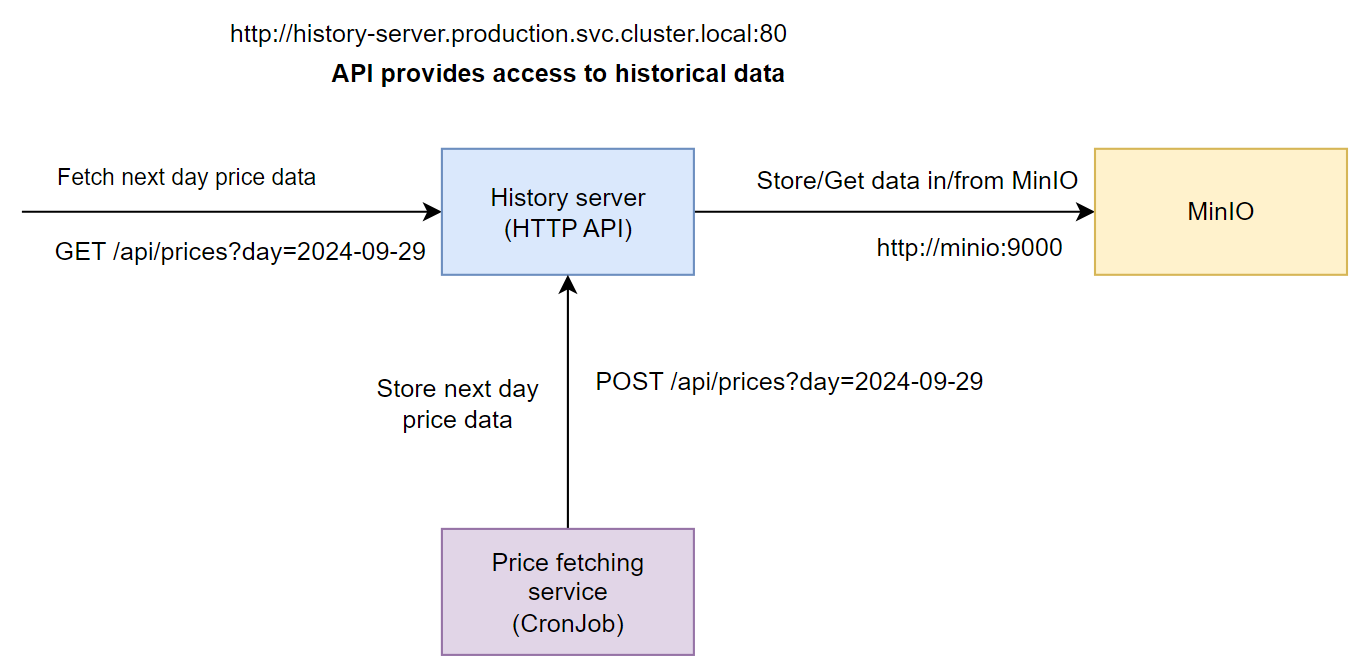
History data server
Info
This app should be a HTTP API server with stores the price records in Garage and exposes this data via JSON interface. The server should have the following endpoints:
- GET
/api/prices?day=<date>- find file for prices for the specified date (format should beday=2025-09-29) in Garage and return them as a response in JSON format; - POST
/api/prices?day=<date>- receive prices in JSON format for the specified date and save the data as a file in Garage.
Complete
Implement the HTTP API server application. You can use any programming language or technologies you want. If you are unsure which approach to use, it is recommended to use either Python FastAPI or Flask frameworks.
An OpenAPI specification for the API has also been prepared, so feel free to generate the HTTP API implementation in any suported languages and implement the logic of the HTTP methods. You can find the API specification here: History server OpenAPI specification
You can find an example skeleton for the Python Flask API (where Garage specific methods are not completed) here: History server Flask example
The main requirement is that you use the exact endpoints that have been specifed and that the price data message JSON format is the following:
[
  {
    "estonian_time": "2025-10-01T00:00:00+03:00",
    "price": 5.01,
    "timestamp": 1727730000
  },
  {
    "estonian_time": "2025-10-01T01:00:00+03:00",
    "price": 3.21,
    "timestamp": 1727733600
  },
  {
    "estonian_time": "2025-10-02T00:00:00+03:00",
    "price": 78.57,
    "timestamp": 1727816400
  }
]
Garage exposes an S3-compatible API, so for the Garage integration, use the official AWS SDK for Python: Boto3. The Garage guide for building your own app provides reasonable examples to start with. Boto3 S3 client methods put_object, get_object, head_bucket (raises a ClientError if the bucket does not exist), and create_bucket should be enough to implement everything needed.
The Boto3 client for Garage should point endpoint_url at the Garage service, use garage as the region, and use path-style addressing. For example:
import os
import boto3
from botocore.client import Config

s3 = boto3.client(
    "s3",
    endpoint_url=os.environ["GARAGE_URI"],  # e.g. http://garage:3900
    aws_access_key_id=os.environ["ACCESS_KEY"],
    aws_secret_access_key=os.environ["SECRET_KEY"],
    region_name="garage",
    config=Config(signature_version="s3v4", s3={"addressing_style": "path"}),
)
Garage connection authentication variables (ACCESS_KEY, SECRET_KEY, and Garage URI should be read in from the environment variables and not hard coded). Also, when storing the data in Garage, you can use the value of the day variable (For example 2025-09-29) as part of the filename. Data should be stored in the price-data Garage bucket. It would be best if the application also checks that the price-data bucket exists and creates it if it does not exist.
After the code is ready and tested, publish the Docker image to the Docker hub. Name of the Docker image in DockerHub should be history-server.
Verify
When testing the solution manually, you can use the following requests to verify it works. Just make sure to replace the IP address in the example request with the correct container or pod IP or localhost:
curl -X POST -d '[ { "estonian_time": "2025-09-28T00:00:00+03:00", "price": 5.01, "timestamp": 1727730000 }, { "estonian_time": "2025-09-28T01:00:00+03:00", "price": 3.21, "timestamp": 1727733600 }, { "estonian_time": "2024-09-28T00:00:00+03:00", "price": 78.57, "timestamp": 1727816400 } ]' --header "Content-Type: application/json" http://10.0.1.130:8080/api/prices?day=2025-09-27
And then checking if the data is available with GET request:
curl http://10.0.1.130:8080/api/prices?day=2025-09-27
Warning
NB! If you get stuck with implementing the use case components, ask for help from the teaching staff in the lab or in Slack.
Price-fetcher
Info
You need to update the price fetcher script so that instead of saving prices locally, it sends the data to the history data server in a JSON format using a HTTP POST method.
Complete
Configure the price fetcher script to read the address of the History data server from system enviorenment variable named HISTORY_SERVER_URI. We will later configure this value through the Kubernetes CronJob manifest when we create a Kubernetes Service for the history data server.
Inside the script, once the data has been collected from Elering API, prepare a JSON, and send a POST request (For example using the requests.post() method in Python) at the History data server API endpoint address HISTORY_SERVER_URI/api/prices?day={tomorrow}, where the tomorrow variable format is 2025-09-29.
Prepare the data in the same JSON format as shown in the previous section and attach it as the request body to the HTTP POST request. Hint: It is ok to replace Elering CSV API request with a similiar JSON request to avoid CSV to JSON parsing steps.
Services
Services are helpful when a single point of access for a Pod/set of Pods is needed. Let's create a simple Service for Garage in the production namespace:
apiVersion: v1
kind: Service
metadata:
  name: garage
spec:
  type: ClusterIP #(1)
  selector: #(2)
    app: garage
  ports: #(3)
  - port: 3900
    targetPort: 3900
spec.typeensures the app available within some scope. In case ofClusterIP, a Service exposes the app within the cluster only.spec.selectorensures the service forwards a traffic to Pods with the provided labels;spec.portsspecifies the list of ports available for the end user (portfield) and maps them to ports of a container (targetPortfield).
History-data-server will access Garage through internal network, hence it makes sense to expose Garage cluster-wise only (type is ClusterIP).
You can view the pods targeted by this server:
kubectl get pod -l app=garage -n production
# NAME       READY   STATUS    RESTARTS   AGE
# garage-0   1/1     Running   0          5d23h
Info
There are different options for Service type:
ClusterIP- Kubernetes assigns an IP from a set available within a cluster only;NodePort- each node in Kubernetes cluster reserves specified ports and forwards traffic to the Service;LoadBalancer- Kubernetes relies on an external load balancer, ignored in the lab;ExternalName- a Service is mapped to a specified DNS name, ignored in the lab;
Cluster IP
Complete
Inspect an IP address of the echoserver Service (Test Kubernetes from lab3):
kubectl describe service/echoserver -n default
# Name:              echoserver
# Namespace:         default
# ...
# IP:                10.106.242.153
# IPs:               10.106.242.153
# Port:              <unset>  80/TCP
# ...
The IP above is cluster-scoped IP meaning it is available only within the cluster.
Verify
You can check if this endpoint actually works via curl tool:
# replace the IP address with one of your service
curl 10.104.159.196:80
# {"host":{"hostname":"...
The output above shows, the endpoint is accessible.
ClusterIP is practical when an app should be available internally, but there is also a possibility to allow traffic from outside the cluster. For this, Gateway API resources (Gateway and HTTPRoute) are required and reviewed in the second part of the lab.
Complete
In the production namespace:
- create a
history-serverDeployment for the history server app using the image you have built previously; - create a ClusterIP-type Service (name -
history-server, listening port - 80) for the Deployment and validate if it works usingcurl; - build the adjusted price-fetcher app, which sends price data to the history-server endpoint, and update the existing CronJob.
NB:
- Please, use the following labels for the history-server Deployment:
app=electricity-calculator,microservice=history-server. Make sure to add them both to the metadata of the Deployment and to the metadata of the pod template; -
Create a new secret named
price-data-secretin theproductionnamespace to store the Garage key credentials for theprice-databucket. You can get the credentials (Key IDandSecret key) with the following command:kubectl exec -it garage-0 -n production -- /garage key info price-fetcher-key --show-secretThen create a manifest file (for example
price-data-secret.yaml) for the secret, replacing the placeholders with the values from the output above:apiVersion: v1 kind: Secret metadata: name: price-data-secret namespace: production type: Opaque stringData: #(1) ACCESS_KEY: <Key ID> SECRET_KEY: <Secret key>stringDataaccepts plain-text values, Kubernetes base64-encodes them into thedatafield when the secret is created
And apply it:
kubectl apply -f price-data-secret.yaml -n productionThe
history-serverDeployment should use the credentials from theprice-data-secretto set up necessary system enviorenment variables. -
Update the price-fetcher
CronJobspecification and add a system enviorenment variable (env:) namedHISTORY_SERVER_URI, which defines how to connect to thehistory server. Its value should be the Service address of the history server:http://history-server.production.svc.cluster.local:80
Hint: To reference the Garage service use http://garage:3900 (Boto3 requires the protocol to be specified before the hostname in endpoint_url). You can find the explanation in the service discovery section.
Info
You can look up status code of a simple response:
curl -I <Service IP>:80
# HTTP/1.1 200 OK
# ...
To validate integrity of the app microservices, you can trigger the new price fetching job manually (see the prevous lab) and view the contents of the Garage bucket using the garage CLI in the Garage Pod. Example output:
kubectl exec -n production garage-0 -- /garage bucket info price-data
# ...
# Size: 1.1 KiB (1.1 KB)
# Objects: 1
# ...
NodePort
The second major type of service is NodePort, which binds selected ports of each cluster node to ports of a Pod. A range of the node ports is between 30000 and 32767.
Complete
Let's create a NodePort service for the echoserver in the default namespace:
apiVersion: v1
kind: Service
metadata:
  name: echoserver-service-nodeport
  namespace: default
spec:
  type: NodePort
  selector:
    app: echoserver
  ports:
  - port: 80
    targetPort: 80
    nodePort: 30001
It works as a previous service selecting Pods by app: echoserver label, but uses a different hostname (echoserver-service-nodeport) for discovery.
After inspecting it, you can see the network-specific data:
kubectl describe service/echoserver-service-nodeport
# ...
# IPs:                      10.109.11.56
# Port:                     <unset>  80/TCP
# TargetPort:               80/TCP
# NodePort:                 <unset>  30001/TCP
# ...
Verify
The server should be accessible via node address now:
curl 0.0.0.0:30001
# {"host":{"hostname":"0.0.0.0"...
Info
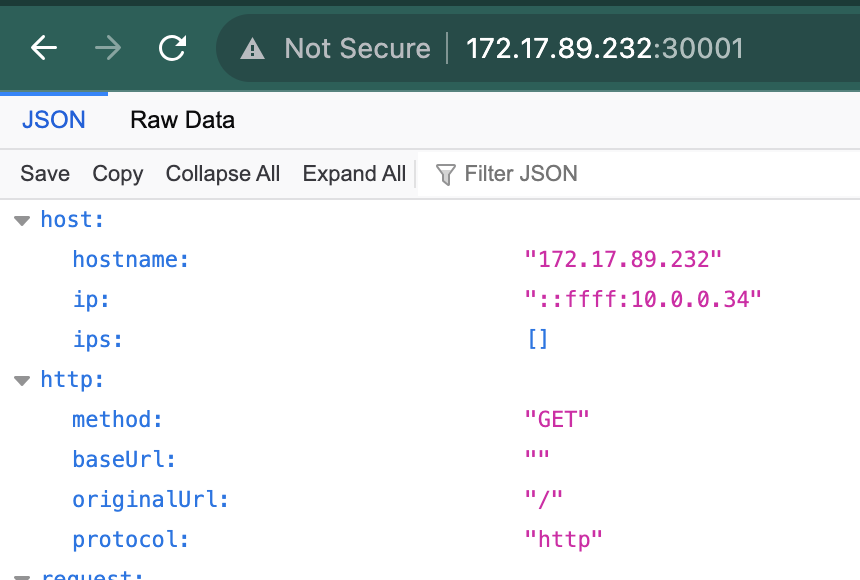
You are able to access the service from your browser using the public IP of your control plane node and the port 30001
You should see a similar page:
Headless Services
Headless Service is a service with no assigned cluster IPs. These services expose each Pod IP separately. Using such services, Pods can discover neighbour Pods by their IPs. For example, Pods managed by a StatefulSet can check availability of each other using IPs exposed by a headless service. Also, using headless services, end-users can access specific Pods for writing and others - for reading. An example is PostgreSQL leader-follower replication: all the writes should go to the leader while reads can be handled by the follower.
A headless service doesn't provide load balancing capabilities and a user can access a specific Pod with this hostname format: <pod-name>.<service-name>.
Complete
Let's create a PostgreSQL StatefulSet with this config:
apiVersion: apps/v1
kind: StatefulSet
metadata:
  name: postgresql-hl-test
  namespace: test
spec:
  selector:
    matchLabels:
      app: postgresql-hl-test
  serviceName: postgresql-hl #(1)
  replicas: 2 #(2)
  template:
    metadata:
      labels:
        app: postgresql-hl-test
    spec:
      containers:
      - name: postgres
        image: postgres:17.6
        imagePullPolicy: "Always"
        env: #(3)
        - name: POSTGRES_DB
          value: "test"
        - name: POSTGRES_USER
          value: "test"
        - name: POSTGRES_PASSWORD
          value: "postgres-password"
        volumeMounts:
        - mountPath: /var/lib/postgresql/data
          name: postgredb
        ports:
        - containerPort: 5432
          name: postgres-port
      volumes: #(4)
        - name: postgredb
          emptyDir: {}
- A name of the headless service created later; used for service discovery between created Pods
- Number of PostgreSQL replicas
- Environment variables for PostgreSQL database setup
- PostgreSQL doesn't use any persistent storage for now
Also, let's create a headless service with the aforementioned name.
apiVersion: v1
kind: Service
metadata:
  name: postgresql-hl
  namespace: test
spec:
  clusterIP: None
  selector:
    app: postgresql-hl-test
  ports:
  - port: 5432
    targetPort: 5432
You can check the created endpoints and see one name has two linked endpoints:
kubectl get endpoints -n test
# NAME            ENDPOINTS                         AGE
# postgresql-hl   10.0.1.213:5432,10.0.2.190:5432   12m
The description of the postgresql-hl service shows 2 endpoints for the postgresql Pods, meaning, you can access each one separately.
...
IP:                None
IPs:               None
Port:              <unset>  5432/TCP
TargetPort:        5432/TCP
Endpoints:         10.0.1.181:5432,10.0.1.42:5432
...
For testing, let's use one of 2 pods to connect to another:
kubectl exec -it postgresql-hl-test-0 -n test -- /bin/bash
# ...
export PGPASSWORD='postgres-password'
psql -h postgresql-hl-test-1.postgresql-hl -U test
# psql (15.4)
# Type "help" for help.

# test=>
After testing, you should see successful connection to the database.
Gateway API
Gateway API is a set of resources that control external access to the services in a Kubernetes cluster. It is the successor of the older Ingress API and splits the responsibilities between several resources:
- GatewayClass - defines which controller implements the Gateways (in this lab - Cilium);
- Gateway - defines listeners (port and protocol) where external traffic enters the cluster;
- HTTPRoute - defines how HTTP requests arriving at a Gateway are routed to Services.
To route the network traffic, a cluster needs a Gateway API implementation. The primary focus of this lab is Cilium Gateway, as Cilium is already installed as the CNI of the cluster, while Kubernetes supports many implementations.
In this lab, the Cilium Gateway runs in host network mode: the Envoy proxy built into Cilium listens directly on every cluster node, on the port specified in the Gateway listener.
Complete
First of all, let's install the Gateway API CRDs:
kubectl apply --server-side -f https://raw.githubusercontent.com/kubernetes-sigs/gateway-api/v1.6.1/config/crd/standard/gateway.networking.k8s.io_gatewayclasses.yaml
kubectl apply --server-side -f https://raw.githubusercontent.com/kubernetes-sigs/gateway-api/v1.6.1/config/crd/standard/gateway.networking.k8s.io_gateways.yaml
kubectl apply --server-side -f https://raw.githubusercontent.com/kubernetes-sigs/gateway-api/v1.6.1/config/crd/standard/gateway.networking.k8s.io_httproutes.yaml
kubectl apply --server-side -f https://raw.githubusercontent.com/kubernetes-sigs/gateway-api/v1.6.1/config/crd/standard/gateway.networking.k8s.io_referencegrants.yaml
kubectl apply --server-side -f https://raw.githubusercontent.com/kubernetes-sigs/gateway-api/v1.6.1/config/crd/standard/gateway.networking.k8s.io_grpcroutes.yaml
kubectl apply --server-side -f https://raw.githubusercontent.com/kubernetes-sigs/gateway-api/v1.6.1/config/crd/standard/gateway.networking.k8s.io_backendtlspolicies.yaml
kubectl apply --server-side -f https://raw.githubusercontent.com/kubernetes-sigs/gateway-api/v1.6.1/config/crd/standard/gateway.networking.k8s.io_tlsroutes.yaml
kubectl apply --server-side -f https://raw.githubusercontent.com/kubernetes-sigs/gateway-api/v1.6.1/config/crd/standard/gateway.networking.k8s.io_tcproutes.yaml
Then upgrade Cilium with Gateway API and NodePort support enabled:
cilium upgrade --version 1.20.1 --set gatewayAPI.enabled=true --set kubeProxyReplacement=true --set nodePort.enabled=true
Enable host network mode for Gateways:
cilium config set gateway-api-hostnetwork-enabled true
Finally, restart the Cilium Pods to force them to reload the configuration (this may not always be needed):
kubectl rollout restart deploy/cilium-operator -n kube-system
kubectl rollout restart ds/cilium -n kube-system
NB! restarting Cilium will disable cilium hubble NodePort again. You should enable it again (check lab 3).
Verify
Check that Cilium is healthy after the upgrade:
cilium status
All components should be reported as OK.
Also, Cilium should have created the cilium GatewayClass. Its ACCEPTED column should be True:
kubectl get gatewayclass
# NAME     CONTROLLER                     ACCEPTED   AGE
# cilium   io.cilium/gateway-controller   True       2m
Complete
Let's create a Gateway for echoserver:
apiVersion: gateway.networking.k8s.io/v1
kind: Gateway
metadata:
  name: echoserver-gateway
  namespace: default
spec:
  gatewayClassName: cilium #(1)
  listeners:
  - name: http
    protocol: HTTP
    port: 31112 #(2)
    allowedRoutes:
      namespaces:
        from: Same #(3)
- GatewayClass created by Cilium; tells Kubernetes that Cilium implements this Gateway
- Node port which the Gateway listens on each node (host network mode). Use
31112for this lab - Only routes from the same namespace (
default) can attach to this Gateway
And an HTTPRoute that forwards traffic from the Gateway to the echoserver Service:
apiVersion: gateway.networking.k8s.io/v1
kind: HTTPRoute
metadata:
  name: echoserver-route
  namespace: default
spec:
  parentRefs: #(1)
  - name: echoserver-gateway
  hostnames:
  - echoserver.PUBLIC_NODE_IP.nip.io #(2)
  rules: #(6)
  - matches:
    - path:
        type: PathPrefix
        value: / #(3)
    backendRefs:
    - name: echoserver #(4)
      port: 80 #(5)
- Gateway this route attaches to
- Hostname for the service. Please, replace the
PUBLIC_NODE_IPwith actual IP of your control-plane node. - HTTPRoute allows different paths for services, in this lab we use only root
- Service name to lookup
- Service port to target
nip.ioforwards traffic to the publicly available IP on third domain level (PUBLIC_NODE_IP in the example)
Verify
Check that the Gateway is programmed (PROGRAMMED column should be True) and the route is attached to it:
kubectl get gateway -n default
kubectl get httproute -n default
kubectl describe httproute/echoserver-route -n default
# ...
#   Conditions:
#     ...
#     Reason:  Accepted
#     Status:  True
# ...
After some time after creation, you are able to test the Gateway via browser. Go to http://echoserver.PUBLIC_NODE_IP.nip.io:31112, where PUBLIC_NODE_IP - external node IP you use for the route hostname, 31112 - the Gateway listener node port. You should see the response similar to one we discovered in the NodePort section.

Service Discovery and Network Policies
Service Discovery in Kubernetes
In Kubernetes, service discovery works in 2 ways:
- Referring a service by a short name (
metadata.name). It works only for the services within the same namespace, for example:echoserver - Referring a service by a fully qualified name. It works for cross-namespace discovery and requires
<service-name>.<namespace>.svc.<cluster>:<service-port>format. Example:echoserver.default.svc.cluster.local:80
Complete
Let's create a new namespace called k8s-lab5:
kubectl create namespace k8s-lab5
and deploy an additional echoserver Pod and Service with the same config as in lab3 (Service should have ClusterIP type).
```bash
kubectl apply -f echoserver-pod.yaml -n k8s-lab5
kubectl apply -f echoserver-service.yaml -n k8s-lab5
```
Verify
When the Pod is up, connect to the echoserver in the default namespace
kubectl exec -it echoserver -- sh
and send request to the Pod in k8s-lab5:
wget -q -O- http://echoserver.k8s-lab5.svc.cluster.local:80/
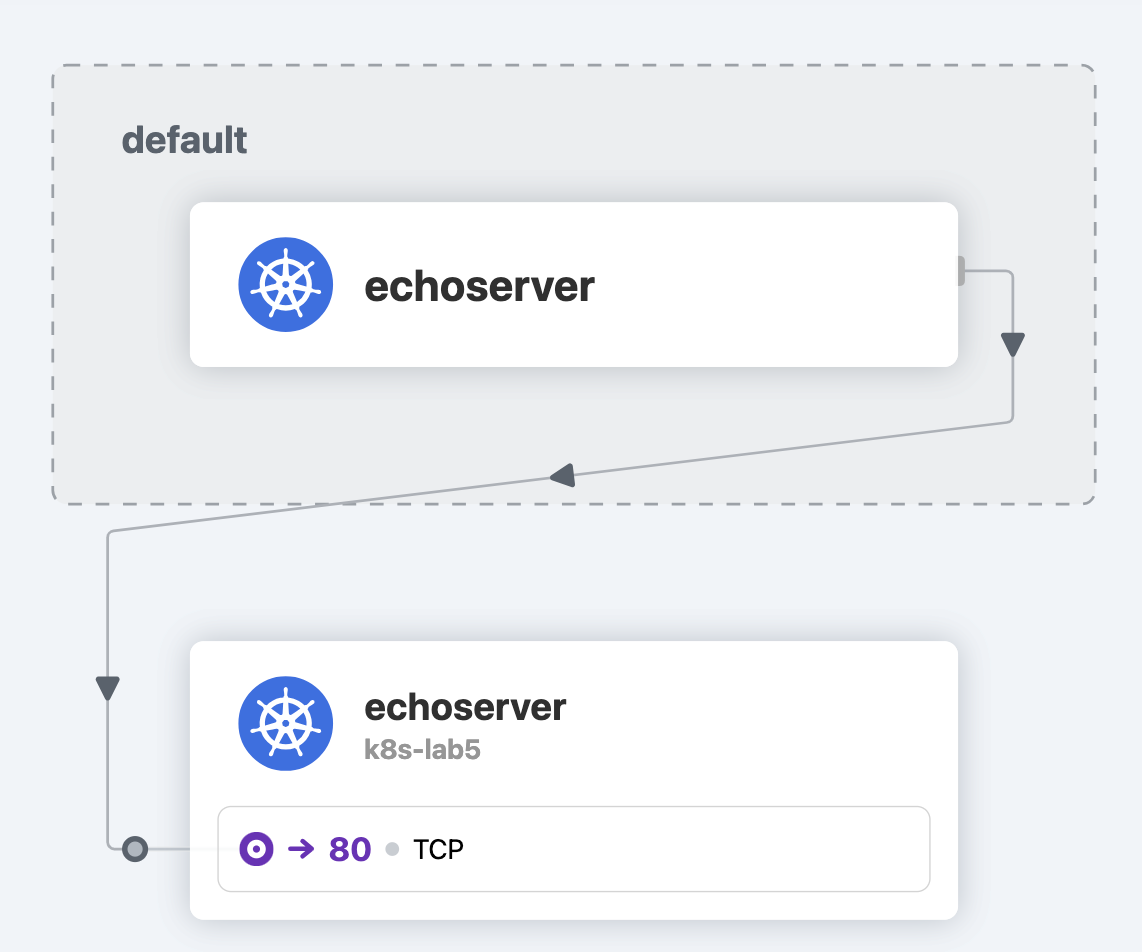
In the browser, you can open Hubble UI, select default namespace and view traffic coming from one echoserver Pod to another. If you set up Hubble in the 3rd lab, you can find the UI in http://<CONTROL_PLANE_EXTERNAL_IP>:31000/. The external IP located in ETAIS portal (Project -> Resources -> VM -> External IP)
NetworkPolicy Resource
Kubernetes uses NetworkPolicy to isolate Pods from unnecessary network connections. Essentially, a policy allows setting up traffic between selected Pods and:
- Pods from same namespace filtered by labels;
- All Pods from a different namespace containing selected labels;
- All IP addresses in the provided IP CIDR subnet.
Also, policies can work for both incoming (ingress) and outgoing (egress) traffic.
Complete
An example policy allowing access to echoserver in default namespace is:
apiVersion: networking.k8s.io/v1
kind: NetworkPolicy
metadata:
  name: echoserver-network-policy
  namespace: default
spec:
  podSelector:
    matchLabels:
      app: echoserver
  policyTypes:
    - Ingress
  ingress:
    - from:
      - namespaceSelector:
          matchLabels: #(1)
            kubernetes.io/metadata.name: k8s-lab5
      - podSelector:
          matchLabels: #(2)
            app: nginx
      ports:
        - protocol: TCP
          port: 80
- All the Pods from
k8s-lab5namespace can access the Pod - All the Pods from the same namespace and labels
name=nginxcan access the Pod
Create a network policy via the manifest above in the default namespace.
NB: This policy could break the lab3-05 check in the scoring site. If this happens, please follow cleanup instructions after completion of the main content of this lab.
Verify
Try to access http://echoserver.default.svc.cluster.local:80/ endpoint from echoserver Pod in k8s-lab5:
kubectl exec -it -n k8s-lab5 echoserver -- sh

wget -q -O- http://echoserver.default.svc.cluster.local:80/
The result should be successful.
Create an NGINX Deployment in the default namespace similar to one from the previous lab. Ensure the labels are correct:
kubectl get pods -l app=nginx -n default
#NAME                    READY   STATUS    RESTARTS   AGE
#nginx-64b87bb78-gdrnl   1/1     Running   0          5d
Now, let's see what happens, when a user sends a request to the endpoint from an nginx Pod:
kubectl exec -it deployment/nginx -n default -- bash

curl -v http://echoserver:80/
The response should be correct too.
The final check is to try accessing the pod from the NGINX pod in the test namespace.
kubectl exec -it deployment/nginx -n test -- bash

curl -v http://echoserver.default.svc.cluster.local:80/ --connect-timeout 5
# curl: (28) Failed to connect to echoserver.default.svc.cluster.local port 80 after 5001 ms: Timeout was reached
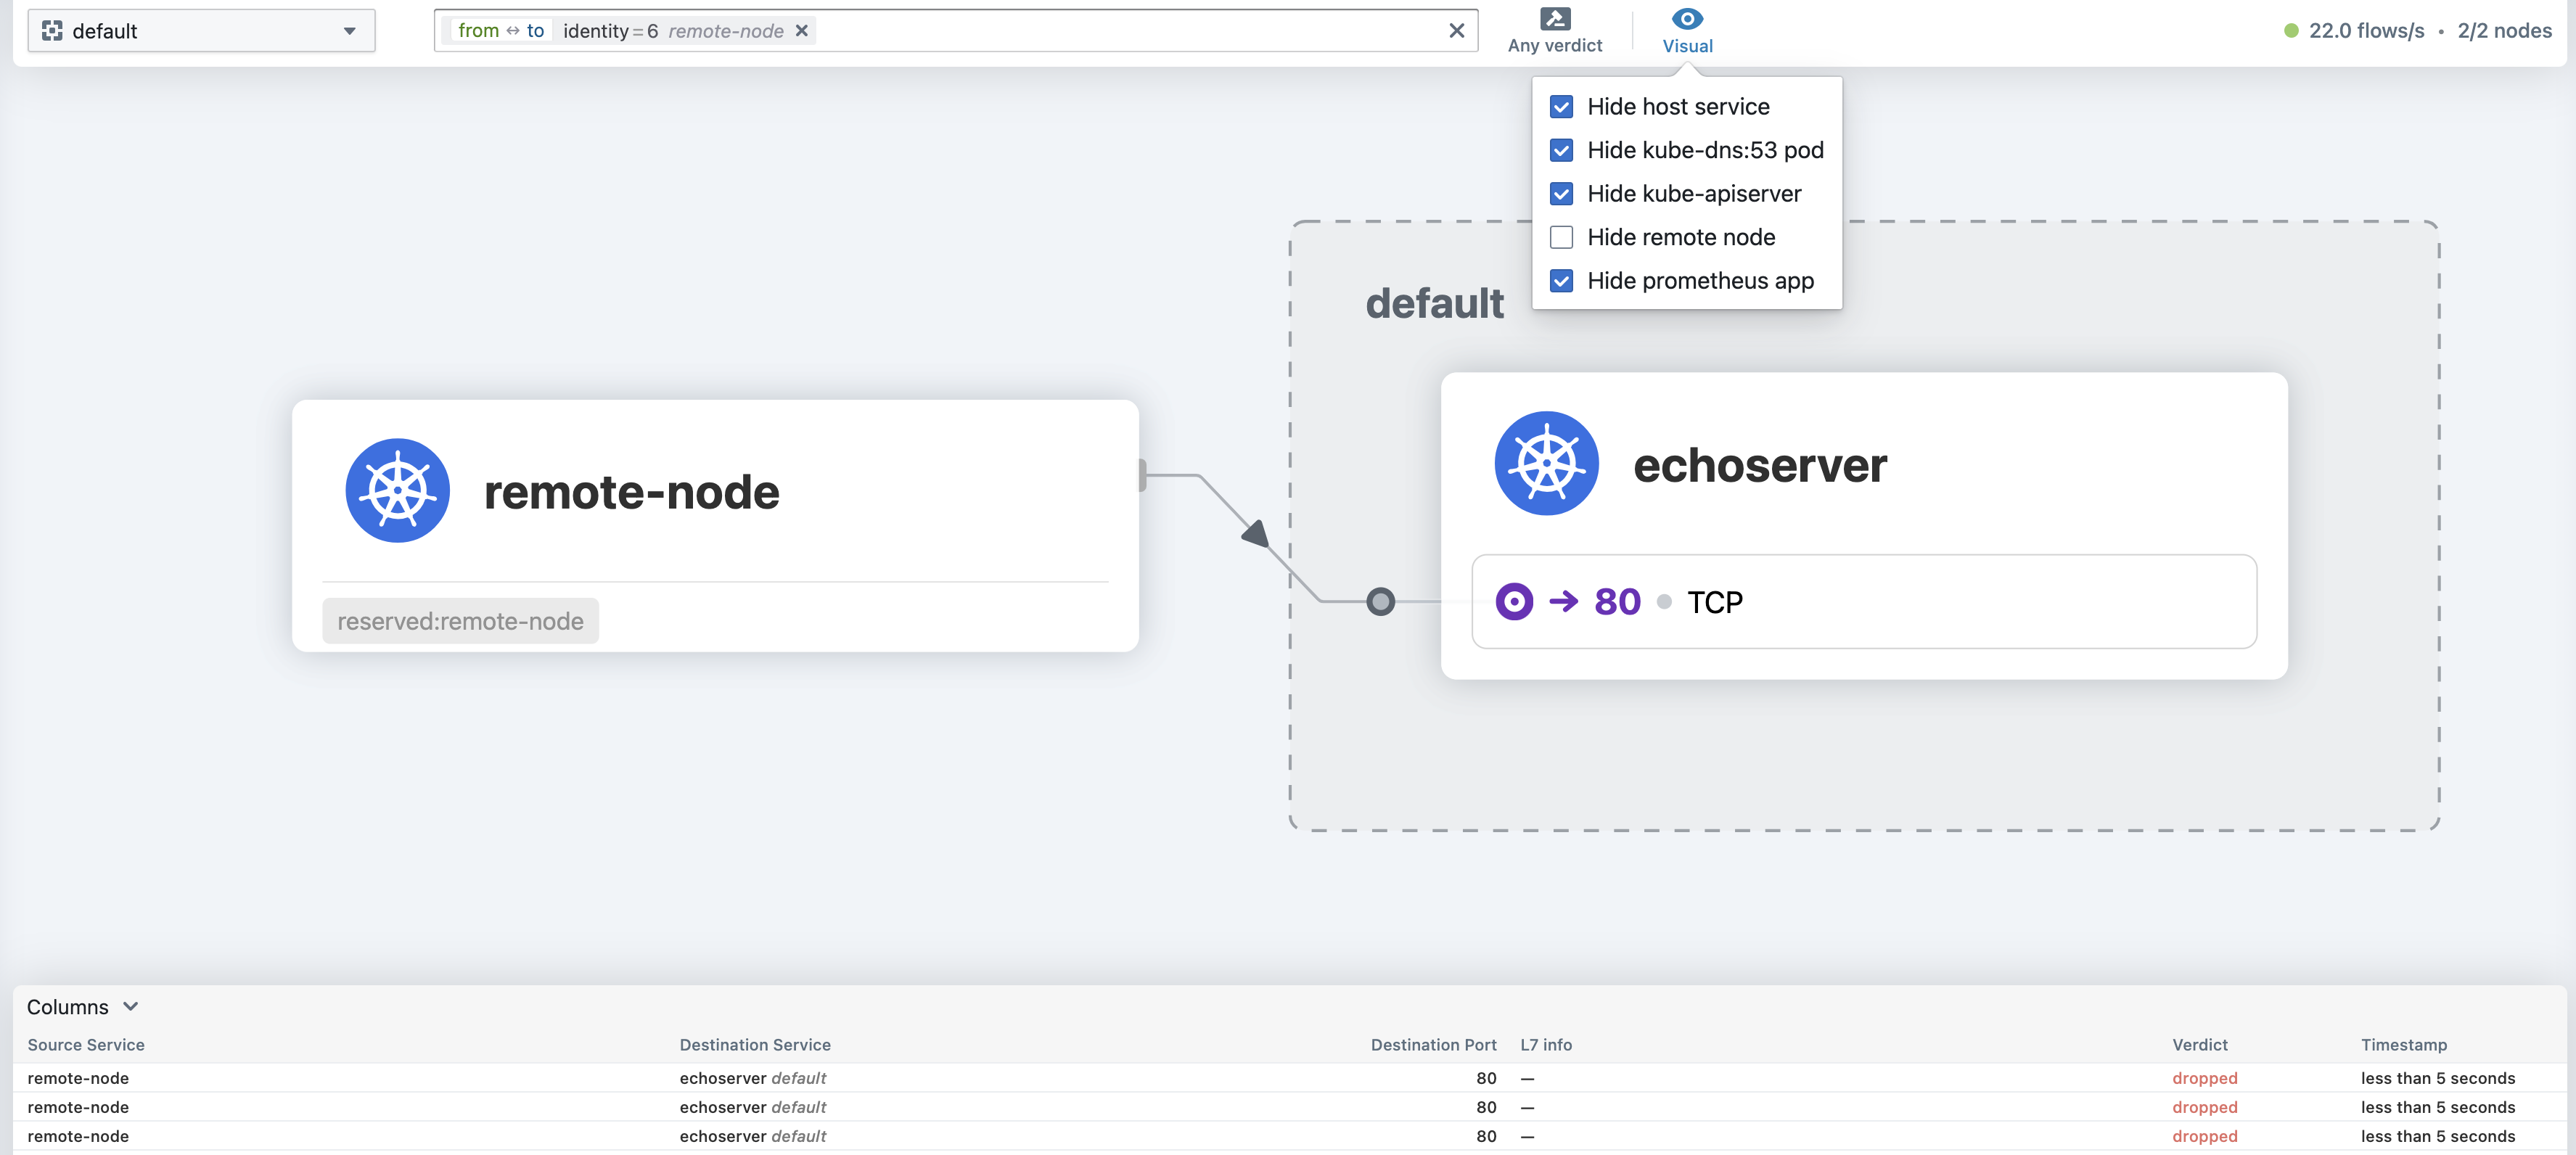
The NetworkPolicy blocks this connection, because it is not listed in the rules.
You can also view the graph with dropped connections in the hubble UI. The result should look like this:
Complete
You need to create network policy for Garage Pods. For this policy, isolate the Garage Pods from all connections except ones from history-server Pod within the same production namespace.
NB: please use garage-network-policy name.
Cleanup
You can safely remove the following resources as they are for testing purposes only and don't affect the lab scoring:
- Service
echoserver-service-nodeportin thedefaultnamespace; - StatefulSet
postgresql-hl-testand servicepostgresql-hlin thetestnamespace; - NetworkPolicy
echoserver-network-policyin thedefaultnamespace; - Deployment
nginxin thedefaultnamespace - Namespace
k8s-lab5.