Lab 8 - CI/CD on Kubernetes
Introduction
Welcome to the lab 9. In this session, the following topics are covered:
- Helm Chart creation for the use-case application;
- GitLab CI runner setup;
- Deployment automation for the use-case app.
Introduction to Helm
In this section we cover Helm installation and basic management capabilities. Helm is a package manager for Kubernetes, which can perform:
- K8s manifests templating using
golangtemplates. A set of manifest templates callsChart. The installed manifests on a Kubernetes cluster after templating performed isRelease. - Chart packaging, dependency management and publication.
- Release versioning and rollback.
Complete
Install Helm tool on your control plane VM:
curl -fsSL -o get_helm.sh https://raw.githubusercontent.com/helm/helm/main/scripts/get-helm-3
chmod 700 get_helm.sh
./get_helm.sh
Create a sample chart and have a look at the contents:
helm create sample
ls -lh sample/
# total 8.0K
# drwxr-xr-x. 2 root root    6 Oct 27 08:34 charts #(1)
# -rw-r--r--. 1 root root 1.2K Oct 27 08:34 Chart.yaml #(2)
# drwxr-xr-x. 3 root root  162 Oct 27 08:34 templates #(3)
# -rw-r--r--. 1 root root 2.2K Oct 27 08:34 values.yaml #(4)
- directory with dependency charts
- main file with chart settings: name, description, type (library or application), version, app version
- Kubernetes manifest templates
- values for templating
Remove all the files under the templates/ folder as we create templates ourself. Let's add the nginx deployment to the templates/deployment-nginx.yaml:
apiVersion: apps/v1
kind: Deployment
metadata:
  name: nginx-chart
  labels:
    app: nginx-chart
    helm.sh/chart: sample
spec:
  replicas: {{ .Values.replicaCount }}
  selector:
    matchLabels:
      app: nginx-chart
      helm.sh/chart: sample
  template:
    metadata:
      {{- with .Values.podAnnotations }}
      annotations:
        {{- toYaml . | nindent 8 }}
      {{- end }}
      labels:
        app: nginx-chart
        helm.sh/chart: sample
    spec:
      containers:
        - name: {{ .Chart.Name }}
          image: "{{ .Values.image.repository }}:{{ .Values.image.tag | default .Chart.AppVersion }}"
          imagePullPolicy: {{ .Values.image.pullPolicy }}
          resources:
            {{- toYaml .Values.resources | nindent 12 }}
          ports:
            - name: http
              containerPort: {{ .Values.service.port }}
              protocol: TCP
          env:
            - name: "KEY"
              value: "VALUE"
          livenessProbe:
            httpGet:
              path: /
              port: http
          readinessProbe:
            httpGet:
              path: /
              port: http
      {{- with .Values.nodeSelector }}
      nodeSelector:
        {{- toYaml . | nindent 8 }}
      {{- end }}
      {{- with .Values.affinity }}
      affinity:
        {{- toYaml . | nindent 8 }}
      {{- end }}
      {{- with .Values.tolerations }}
      tolerations:
        {{- toYaml . | nindent 8 }}
      {{- end }}
As you can see, lot of values in the manifest are templated. This simplifies changing of common parts through a single values.yaml file.
Now, let's install the release:
helm install nginx-release sample/ -n test
# NAME: nginx-release
# LAST DEPLOYED: Wed Oct 16 10:10:49 2024
# NAMESPACE: test
# STATUS: deployed
# REVISION: 1
# TEST SUITE: None
- Indicates the release is installed successfully.
- Each revision has its number and you can rollback to the desired one if needed.
Validate
After installation, you can list releases within the namespace:
helm list -n test
# NAME            NAMESPACE       REVISION        UPDATED                                 STATUS          CHART           APP VERSION
# nginx-release   test            1               2024-10-16 10:10:49.258833247 +0000 UTC deployed        sample-0.1.0    1.16.0
and view the created Pod:
kubectl get pods -l helm.sh/chart=sample -n test
# NAME                           READY   STATUS    RESTARTS   AGE
# nginx-chart-84f7fd9546-crcwt   1/1     Running   0          15s
Complete
Let's add a service to the deployment (file templates/service-nginx.yaml):
apiVersion: v1
kind: Service
metadata:
  name: "nginx-chart"
  labels:
    app: nginx-chart
    helm.sh/chart: sample
spec:
  type: {{ .Values.service.type }} #(1)
  ports:
    - port: {{ .Values.service.port }} #(2)
      targetPort: http
      protocol: TCP
      name: http
  selector:
    app: nginx-chart
    helm.sh/chart: sample
- Service type,
ClusterIPin this case - The same port as we use in the deployment
Then upgrade the chart:
helm upgrade nginx-release sample/ -n test
# Release "nginx-release" has been upgraded. Happy Helming!
# NAME: nginx-release
# LAST DEPLOYED: Wed Oct 16 10:12:25 2024
# NAMESPACE: test
# STATUS: deployed
# REVISION: 2
# TEST SUITE: None
Validate
You can view the created service and check it works:
kubectl get service -l helm.sh/chart=sample -n test
# NAME          TYPE        CLUSTER-IP      EXTERNAL-IP   PORT(S)   AGE
# nginx-chart   ClusterIP   10.107.82.204   <none>        80/TCP    62s
curl 10.107.82.204
# <!DOCTYPE html>
# <html>
# ...
Info
Check the variables and values in the values.yaml file.
Helm Chart for use-case application
In this section, we create a Helm Chart for the use-case app. As we already know, a chart is a set of Kubernetes manifest templates combined with values. The layout for our chart looks like this:
electricity_calculator/
├── Chart.lock
├── charts
│   └── minio-5.4.0.tgz
├── Chart.yaml
├── templates
│   ├── cronjob-price-fetcher.yaml
│   ├── deployment-application-server.yaml
│   ├── deployment-history-server.yaml
│   ├── service-application-server.yaml
│   └── service-history-server.yaml
└── values.yaml
Chart.yaml- the main file describing the chart's metadata: name, version, dependencies, etc.;charts- directory with chart's dependencies; in the case, it contains MinIO chart only;templates/- a directory with Kubernetes manifest templates;values.yaml- a file containing values for templating.
Chart.yaml
The Chart.yaml contains basic metadata for the chart and MinIO dependency sub-chart. Before release installation, helm needs the dependencies to be in charts/ directory. For this, a user needs to install the dependencies manually using helm dependencies update <chart-path>. Before helm tool installs a chart, it checks the chart/ folder and installs the containing charts together with the main one.
Complete
On your control plane machine, create a electricity_calculator directory and add Chart.yaml to the root with this content:
apiVersion: v2
name: electricity_calculator
description: A electricity calculator chart for Kubernetes
type: application
version: 0.1.0
appVersion: "1.0.0"

dependencies:
- name: minio # (1)
  version: 5.4.0 #(2)
  repository: https://charts.min.io/ #(3)
  alias: minio #(4)
  condition: minio.enabled #(5)
- Name of the chart
- Chart version
- Chart repository
- A reference name for
values.yamlfile - Condition to include the chart to a release
templates directory
templates/ folder contains all the manifest templates for the application. In our case, there are:
- Price-fetcher CronJob;
- History server Deployment and Service;
- Application server Deployment and Service.
Complete
Create a templates directory inside the electricity_calculator folder. The first file we add is a CronJob manifest template:
apiVersion: batch/v1
kind: CronJob
metadata:
  name: price-fetcher
  labels: # (1)
  {{ with .Values.common.labels }} #(2)
  {{ toYaml . | nindent 4 }}
  {{ end }}
spec:
  timeZone: {{ .Values.priceFetcher.timezone }} #(3)
  schedule: {{ .Values.priceFetcher.schedule | quote }} #(4)
  jobTemplate:
    spec:
      template:
        metadata:
          labels:
          {{ with .Values.common.labels }}
          {{ toYaml . | nindent 12 }}
          {{ end }}
        spec:
          containers:
          - name: price-fetcher
            image: {{ .Values.common.imageRegistry }}/{{ .Values.priceFetcher.image.repository }}:{{ .Values.priceFetcher.image.tag }} #(5)
            imagePullPolicy: {{ .Values.common.imagePullPolicy }} #(6)
            env:
            - name: HISTORY_DATA_SERVER_URL
              value: http://history-server/api #(7)
          restartPolicy: OnFailure
- Common labels across all the chart manifests
- Using this construction, a user can set a scope for the code block. This helps to avoid long references to values, example:
.usernameinstead of.Values.app.username - Timezone parameter for the CronJob schedule settings
- Cron-like parameter for the CronJob schedule settings
- Image name constructed from registry, image name (repository) and a tag
- Common setting for image pull policy
- The hostname of the history data server; should match the service name
The second one is the history server deployment. Don't forget to adjust env variable names and other settings if they are different in your implementation.
apiVersion: apps/v1
kind: Deployment
metadata:
  name: history-server
  labels:
  {{ with .Values.common.labels }}
  {{ toYaml . | nindent 4 }}
  {{ end }}
spec:
  selector:
    matchLabels:
      microservice: history-server
  template:
    metadata:
      labels:
        {{ with .Values.common.labels }}
        {{ toYaml . | nindent 8 }}
        {{ end }}
        microservice: history-server
    spec:
      containers:
      - name: history-server
        image: {{ .Values.common.imageRegistry }}/{{ .Values.historyServer.image.repository }}:{{ .Values.historyServer.image.tag }}
        imagePullPolicy: {{ .Values.common.imagePullPolicy }}
        livenessProbe:
          initialDelaySeconds: 10
          periodSeconds: 5
          failureThreshold: 5
          httpGet:
            port: 8000
            path: /api/prices/?day=2025-10-01
        readinessProbe:
          initialDelaySeconds: 15
          periodSeconds: 5
          failureThreshold: 5
          httpGet:
            port: 8000
            path: /api/prices/?day=2025-10-01
        env:
        - name: "MINIO_SERVER_URL"
          value: "electricity-calculator-minio:9000" #(1)
        - name: "MINIO_ACCESS_KEY"
          valueFrom:
            secretKeyRef:
              name: "electricity-calculator-minio" #(2)
              key: "rootUser"
        - name: "MINIO_SECRET_KEY"
          valueFrom:
            secretKeyRef:
              name: "electricity-calculator-minio"
              key: "rootPassword"
        - name: "MINIO_BUCKET_NAME"
          value: "price-data"
        {{- with .Values.historyServer.resources }} #(3)
        resources:
        {{- toYaml . | nindent 10 }}
        {{- end }}
- Service name for the MinIO created in sub-chart. In this case, constructed like "release_name + -minio"
- Secret name for the MinIO admin user credentials. In this case, constructed like "release_name + -minio"
- Resource setup are extracted to
values.yamlso they can be easily modified
For the history server, add the service template:
apiVersion: v1
kind: Service
metadata:
  name: history-server
spec:
  type: ClusterIP
  selector:
    microservice: history-server
  ports:
  - port: {{ .Values.historyServer.service.port }} #(1)
    targetPort: 8000 #(2)
- The public port can be set in values.yaml
- The private port can be different in your implementation
Complete
Create deployment and service templates also for the application server. They should be similar to the ones for the history-server.
values.yaml file
This file contains default values for templating. For customization, a user can modify the existing file or pass additional ones to the helm install command.
Complete
Create a values.yaml file in the electricity_calculator/ directory with the following content:
imagePullSecrets: [] #(1)

common: #(2)
  imageRegistry: "registry.hpc.ut.ee/mirror"
  imagePullPolicy: Always
  labels:
    app: electricity-calculator
    helm.sh/chart: electricity-calculator

priceFetcher: #(3)
  timezone: "Etc/UTC"
  schedule: "0 12 * * *"
  image:
    repository: fronox/price-fetcher-script
    tag: "1.0.1"

historyServer: #(4)
  image:
    repository: fronox/history-data-server
    tag: "1.0.0"
  resources:
    requests:
      memory: "128Mi"
      cpu: "250m"
    limits:
      memory: "256Mi"
      cpu: "500m"
  service:
    port: 80

applicationServer: #(5)
  image:
    repository: "fronox/application-server"
    tag: "1.0.0"
  resources:
    requests:
      memory: "128Mi"
      cpu: "250m"
    limits:
      memory: "256Mi"
      cpu: "500m"
  service:
    port: 80

minio: #(6)
  enabled: true
  image:
    registry: "registry.hpc.ut.ee/mirror"
    repository: "minio/minio"
    tag: "RELEASE.2024-12-18T13-15-44Z"
  persistence:
    enabled: true
    size: 4Gi
  rootUser: "adminuser" #(7)
  rootPassword: "f487641a7082236d1f3c8217253cc3f51cece53a"
  mode: "standalone"
  resources:
    requests:
      memory: "2Gi"
  buckets:
  - name: price-data
- Standard values for Helm chart with dependencies and optional custom registry requiring credentials
- Common settings for the manifests, for example, labels and custom registry URL
- Price fetcher customization settings
- History server customization settings
- Application server customization settings
- Settings for MinIO `sub-chart
- Setting credentials in plan text is a bad idea for production systems, but we use it for testing
NB: don't forget to adjust image repo names, for example, fronox/price-fetcher-script is a demonstration repo name.
Deploy Electricity Calculator release
Complete
Let's create a separate namespace for the release:
kubectl create namespace lab8
Update chart dependencies and install Electricity Calculator release
helm dependency update electricity_calculator/
helm install electricity-calculator electricity_calculator/ -n lab8
NB: you may see many warnings upon the final status message, please, ignore them for now.
Verify
After the previous steps, you should see the similar output:
NAME: electricity-calculator
LAST DEPLOYED: Wed Oct 16 18:23:00 2024
NAMESPACE: lab8
STATUS: deployed
REVISION: 1
TEST SUITE: None
Also, you can check release status using the following command:
helm list -n lab8
# NAME                    NAMESPACE       REVISION        UPDATED                                 STATUS          CHART                          APP VERSION
# electricity-calculator  lab8            1               2024-10-16 18:23:00.509044439 +0000 UTC deployed        electricity_calculator-0.1.0   1.0.0
Make sure all the pods get deployed successfully:
kubectl get pods -n lab8
NAME                                            READY   STATUS    RESTARTS   AGE
application-server-58cffc54d7-jx4cg             1/1     Running   0          13m
electricity-calculator-minio-68b7bfd8d5-pr8db   1/1     Running   0          18m
history-data-server-76496786cf-6l7hr            1/1     Running   0          18m
Also, test that you can create new Cronjobs, and use the History Server API and Application Server API without errors.
GitLab CI
GitLab is the primary git hosting system we use during this lab. You need to login into https://gitlab.cs.ut.ee/ and create a blank project for the Electricity Calculator Helm Chart. Before you continue, add your ssh key to your account.
Push the Electricity Calculator chart code to your GitLab repository
Complete
After project creation, clone it and copy electricity_calculator/ directory you created before to the root of the local repository. Create a .gitignore file, add the changes, commit them and push code to the remote repository:
git clone git@gitlab.cs.ut.ee:REMOTE_REPO_GROUP/REMOTE_REPO_NAME.git # adjust the repository URL
# Go to the new directory and execute:
echo "electricity_calculator/charts/**" > .gitignore
git add .
git commit -m 'Add Helm Chart'
git push
Setup a service account and a certificate for the GitLab runner
A GitLab runner is a process executing the CI tasks. First of all, it needs a kubeconfig file with a service account token to access lab8 namespace. For this, we should create a admin role for the lab8 namespace, add a service account for GitLab runner and bind the account to the role.
Complete
Let's create an admin role, apply the following manifest:
apiVersion: rbac.authorization.k8s.io/v1
kind: Role
metadata:
  name: admin-role
  namespace: lab8
rules:
- apiGroups:
  - ""
  - extensions
  - apps
  - batch
  - autoscaling
  - networking.k8s.io
  - rbac.authorization.k8s.io
  - policy
  resources:
  - '*'
  verbs:
  - get
  - list
  - watch
  - create
  - update
  - patch
  - delete
Now, add a service account and bind it to the role:
SERVICE_ACCOUNT_NAME=gitlab-runner
ROLE_NAME=admin-role
kubectl create serviceaccount ${SERVICE_ACCOUNT_NAME} -n lab8
kubectl create rolebinding gitlab-runner-admin -n lab8 --role=${ROLE_NAME} --serviceaccount=lab8:${SERVICE_ACCOUNT_NAME}
Create a token for the account, which never expires:
apiVersion: v1
kind: Secret
metadata:
  name: gitlab-runner-token
  namespace: lab8
  annotations:
    kubernetes.io/service-account.name: gitlab-runner
type: kubernetes.io/service-account-token
And finally construct a kubeconfig file. NB: in the SERVER variable, replace CONTROL_PLANE_IP with IP of your control plane node
CA=$(kubectl get secret/gitlab-runner-token -n lab8 -o jsonpath='{.data.ca\.crt}')
TOKEN=$(kubectl get secret/gitlab-runner-token -n lab8 -o jsonpath='{.data.token}' | base64 --decode)
SERVER=https://CONTROL_PLANE_IP:6443 # TODO: paste your control plane node public IP
NAMESPACE=lab8
SERVICE_ACCOUNT_NAME=gitlab-runner
echo "
apiVersion: v1
kind: Config
clusters:
- name: kubernetes
  cluster:
    certificate-authority-data: ${CA}
    server: ${SERVER}
contexts:
- name: ${NAMESPACE}
  context:
    cluster: kubernetes
    namespace: ${NAMESPACE}
    user: ${SERVICE_ACCOUNT_NAME}
current-context: ${NAMESPACE}
users:
- name: ${SERVICE_ACCOUNT_NAME}
  user:
    token: ${TOKEN}
" > gitlab-runner.kubeconfig
Save this file as you need it for future steps.
Setup GitLab Runner
Complete
Let's create a GitLab runner, which executes all the CI/CD job in your kubernetes cluster, using the dedicated Helm chart.
helm repo add gitlab https://charts.gitlab.io #(1)
helm repo update gitlab #(2)
helm search repo -l gitlab/gitlab-runner #(3)
- Add a repository to local list
- Update repository cache
- Lookup the remote GitLab runner chart
Next, you need to get gitlab credentials to register a runner. For this:
- Go to your
Project Settings -> CI/CD -> Runners - Uncheck
Enable instance runners for this project - In
Project Runnerssection clickNew project runner - Check
Run untagged jobs - Set
Maximum job timeoutto600 - Click
Create runner - Make a copy of the
tokenthat is shows under theStep 1section.
Now you can a new custom-values.yaml file with the following content to set correct GitLab URL and registration token for the runner:
gitlabUrl: https://gitlab.cs.ut.ee/
rbac:
  create: true
serviceAccount:
  create: true
runnerToken: "glrt-..." #(1)
- Use the previously created token
Create a separate namespace for the GitLab runner and install the Helm release:
kubectl create namespace gitlab-ci
helm repo add gitlab https://charts.gitlab.io
helm install --namespace gitlab-ci -f custom-values.yaml gitlab-runner gitlab/gitlab-runner
Verify
In the project settings, you should see the runner:
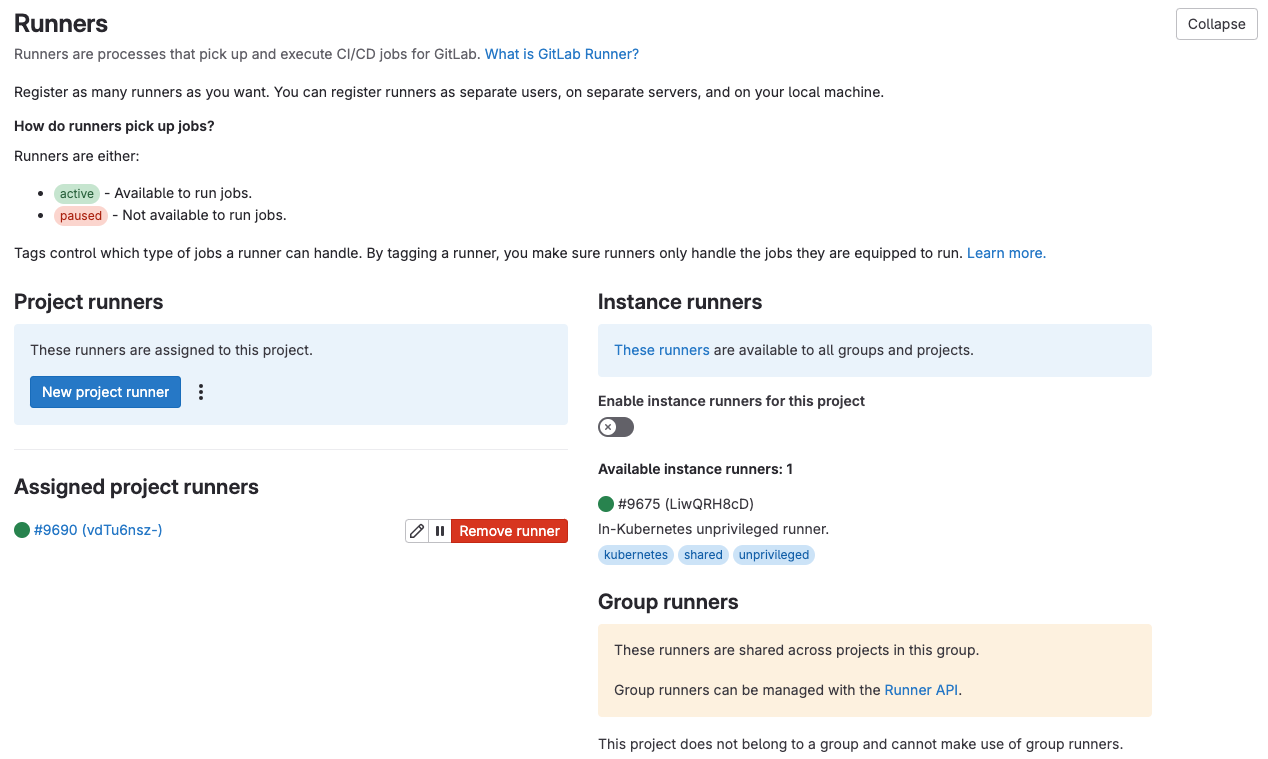
Complete
Let's add the kubeconfig file we created before to the runner environment:
- go to
Project Settings -> CI/CD -> Variables -> Add variable; - use
KUBECONFIGasKey; - paste the content of the
kubeconfigfile we created before toValue; - select
Fileas a type; - check
Protect variable; - Set Visibility to
Visible - click
Add variable.
Using this config, the runner is able to update the exiting Electricity Calculator release.
Configure CI/CD pipeline
Complete
As a final task in the lab, let's create a pipeline consisting of 2 jobs: Helm chart lint and Electricity Calculator upgrade. For this, create a .gitlab-ci.yml file in your project's root and paste the following content there:
stages: #(1)
  - test
  - deploy

image: #(2)
  name: "registry.hpc.ut.ee/mirror/alpine/helm:3.16.2"
  entrypoint: [""]

Lint Helm chart: #(3)
  stage: test
  rules:
    - if: '$CI_COMMIT_BRANCH == $CI_DEFAULT_BRANCH'
  script:
    - helm lint electricity_calculator/

Upgrade electricity-calculator release: #(4)
  stage: deploy
  rules:
    - if: '$CI_COMMIT_BRANCH == $CI_DEFAULT_BRANCH'
  script:
    - helm dependency update electricity_calculator/
    - helm upgrade electricity-calculator electricity_calculator/ --namespace lab8
- Sequence of stages
- Docker image setting for jobs, we use alpine/helm for both
- Job for Helm chart lint
- Job for release update
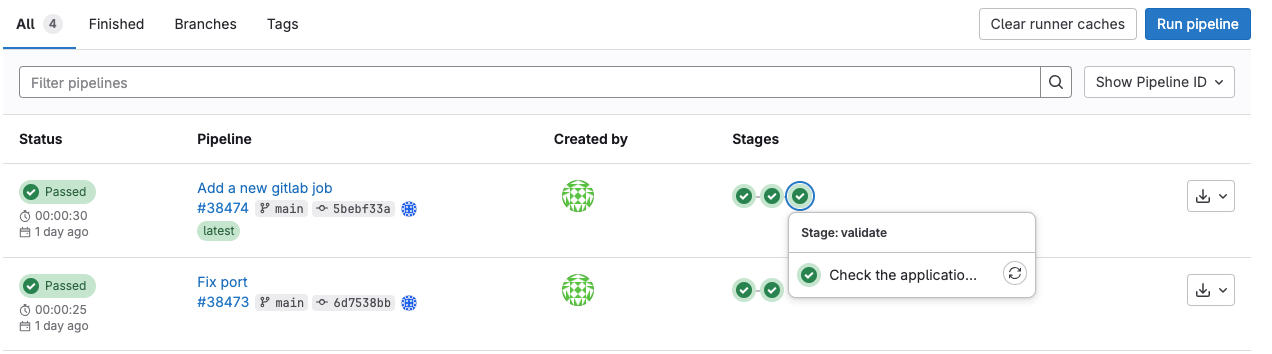
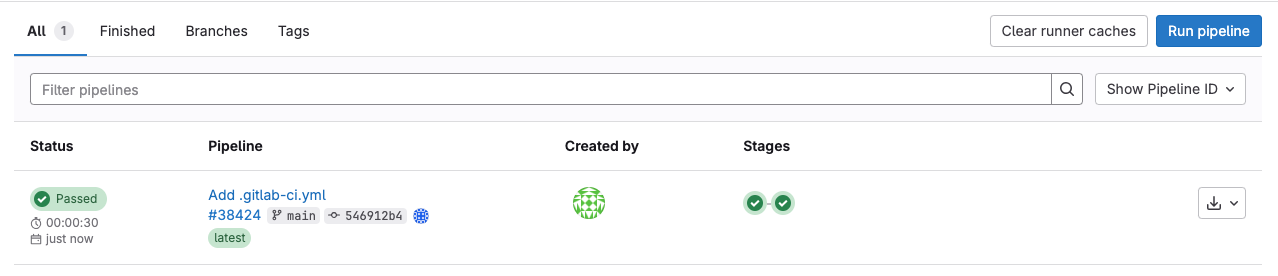
Verify
After pushing this file to the repository, go to project page -> Build -> Pipelines and view the results there, for example:
Independent task 1
Complete
In the existing chart, create a template for application-server NodePort service with a configurable node port. Put the new template to the same GitLab repository.
Example for a NodePort service for echoserver (Do not use it directly):
apiVersion: v1
kind: Service
metadata:
  name: echoserver-service-nodeport
spec:
  type: NodePort
  selector:
    app: echoserver
  ports:
  - port: 80
    targetPort: 80
    nodePort: {{ .Values.echoserver.service.nodePortNumber }}
Also, add a new variable to the values.yaml fail for defining the application server nodePort.
Independent task 2
Complete
You need to create a CI/CD job checking the NodePort service created in the previous task. For this:
- add a new stage for the job (for example,
smoke test/validate); - use curl to check an HTTP status code against the public IP address of a node and the exposed node port number;
- set a rule so that it runs only for the default branch.
After creation, you should see an additional job in the pipeline for the main branch: